
How to make Perfect sourdough bread from start to finish
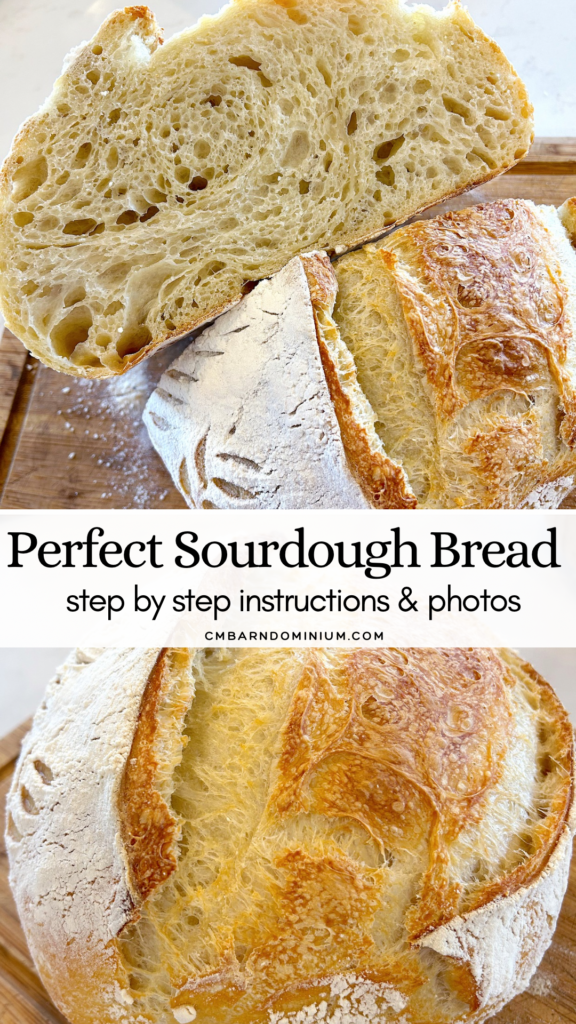
Making Sourdough bread can feel so intimidating! I tried many different methods and recipes when I first started and this is my absolute FAVORITE recipe. It is easy to follow and comes out soft and chewy with perfect crisp edges!
I started my sourdough bread journey back in 2020 when so many of us did. I found a simple method that worked and made decent bread, but I wanted more. A couple years ago I really dove into the world of sourdough bread and learned all that I could. While at first it felt extremely overwhelming, it allowed me to develop a method and recipe that was simple enough for anyone to follow but still resulted in the most delicious artisan bread!
People joke all the time that sourdough consumes your life and you will have no time to leave your house. I strongly disagree! Finding a timeline that works with your schedule and allows you to have fresh bread on hand at all times is very doable!
I have helped many sourdough beginners through the process of making their first delicious loaf of bread with this recipe and I know you will love it too.
This post contains affiliate links which means I make a small commission at no extra cost to you.
Tips for the best sourdough bread
- Start with a healthy starter that is at its peak! One of the easiest way to have sourdough that doesn’t turn out is to use a starter that is not thriving or is past it’s peak rise. More on this below.
- Using the right flour. Bread flour or unbleached all purpose flour are the most common ones used for sourdough bread. I have always used unbleached all purpose flour and had great success but have also heard that depending on where you live, the flour may be slightly different. I recommend asking some people who you know make bread in your state/country and see what they use.
- Build enough strength in your dough. During the first segment of rise time you will do what are called coil folds or stretch and folds. These are essential in helping build the structure of your dough.
- Avoid under proofing or over proofing your dough. This can take a bit of trial and error depending on how warm it is in your home. I always recommend to start with 5- 6 hours for the bulk fermentation and go longer if needed. I leave mine for exactly 8 hours so it can rest while I sleep and it works great. You want the dough to have doubled in size and not be super sticky to the touch.
- Make sure your Dutch oven is nice a hot before you add your bread! Your bread will go straight from the fridge into a preheated Dutch oven. There are other methods of baking sourdough bread, but for simplicity and control a Dutch oven is great!
- Allow the bread to cool for at least 1-2 hours before slicing. I know we all DIE for fresh warm bread but it is extremely difficult to slice when its warm and can end up squishing your bread and turning it gummy. Just wait a bit longer and I promise it will be worth it!
How do I Make sure That I have a healthy starter that is ready to use?
- Start by feeding it a high ratio of flour and water to existing starter. When you are first building your starter it is standard to feed it equal part flour an water to the existing start (1:1:1). I have found that feeding a 1:4:4 ratio yields a nice strong starter. I leave about 1/4 cup of starter in my jar and feed it 130g flour and 130g water.
- Your starter should take anywhere from 6-10 hours to reach its peak. This will depend on how warm it is in your home but if your starter is growing and doubling in size extremely quick, you may want to feed an even higher ratio.
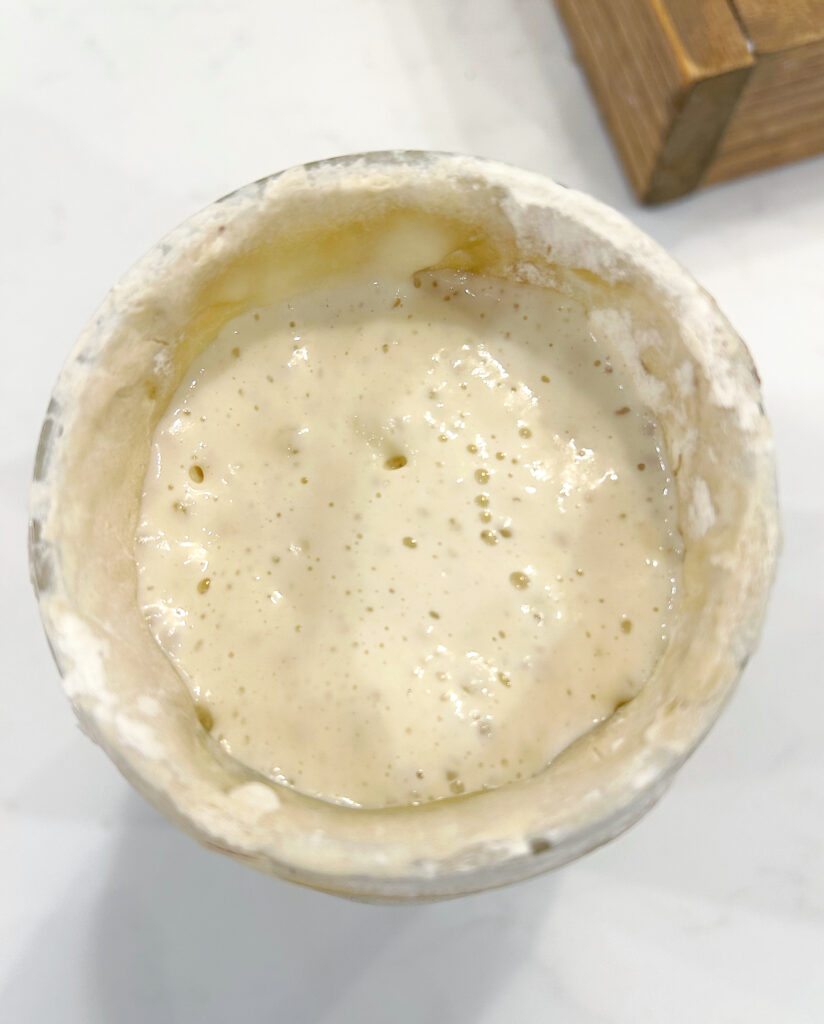
- It has reached its peak and has not fallen yet! You will hear people say this all the time and the best way to describe it is that you want your starter to have bubbles at the top and it should be level. As the starter grows it will create a dome on the top. once it reaches peak, that dome will flatten out. It will not stay like that forever though. Once you notice that your starter has starter is looking slightly sunken in at the top, it is no longer at its peak.
There are still times when you can make great bread even if you miss one of these cues, but I always recommend keeping these tips in mind for the greatest chance at successful, beautiful bread!
Sourdough bread ingredients
Flour– As mentioned above, I recommend starting with bread flour or unbleached all purpose flour. These will be the easiest to work with if you are just starting your bread journey.
Water- Filtered room temperature water is best.
Sourdough Starter– Use a nice active starter that is at its peak.
Salt– Almost any kind of fine salt with work. I use pink Himalayan salt because that is what I always have on hand.
Tools and Equipment needed
You can make delicious sourdough bread with almost no special equipment, however there are a handful of items that can help you on your journey of baking beautiful bread! I have listed all of my favorite below in order of most important to least.
- A Dutch Oven. While there are many ways to bake sourdough, using a Dutch oven can be one of the simplest ways to get started. There are several different sizes out there and they can be hundreds of dollars, however I own both a high end one and this cheap one from amazon and they bake identical bread! Find it here https://amzn.to/40ZLFIr
- Bannetons. These are the bread baskets that you out your dough into after its shaped, for its cold fermentation. You can use a bowl with a tea towel no problem, but using bannetons keeps your loaves in a ideal shape and save space in your fridge. I own several of these ones and they are great! https://amzn.to/4gG65fj
- Dough Whisk. I used a wooden spoon for year to mix my bread dough until I discovered dough whisks. These special whisk are sturdier than a standard whisk and allow the dough to get mixed more evenly than with just a wooden spoon. This ensure no clumps or dry flour in your dough. This one is cheap and has worked perfectly for me. https://amzn.to/41gieTE
- Bread Lame. This is essential a sharp little razor blade with a handle that allows you to score the top of your bread giving it space to breathe and make your bread beautiful. There are all different types of bread lames out there so just use whichever shape you find most comfortable to hold. I have both a round one and a couple of these longer handled ones and I much prefer these! https://amzn.to/4jTdj2m
- Bread Sling. This was one of the last tolls I discovered for my sourdough bread baking and it is a game changer. Its a little mat with handles that sits in the bottom of your Dutch oven. You place your bread on it and it allows you to easily put the bread in and out of the Dutch Oven without burning yourself. They are cheap, and reusable. https://amzn.to/3Qkh2Zj

How To- Mix and bulk ferment
1.Start by mixing the water and sourdough starter in a large mixing bowl. You can do this with a wooden spoon or a dough whisk.
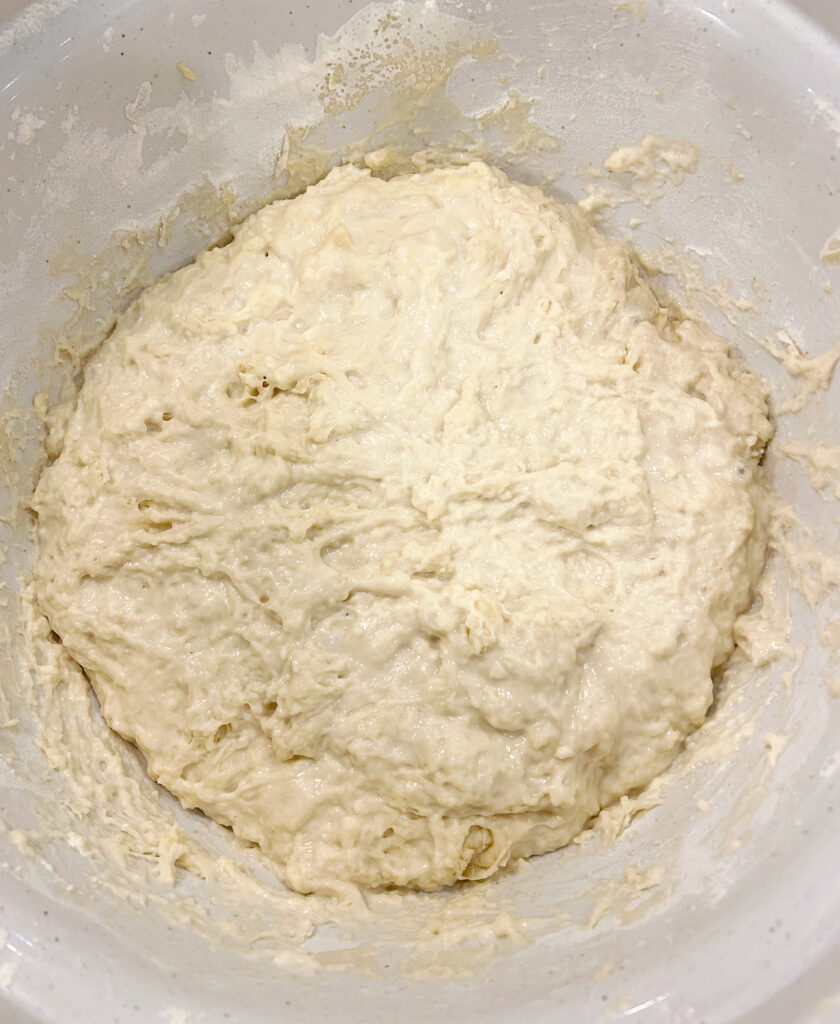
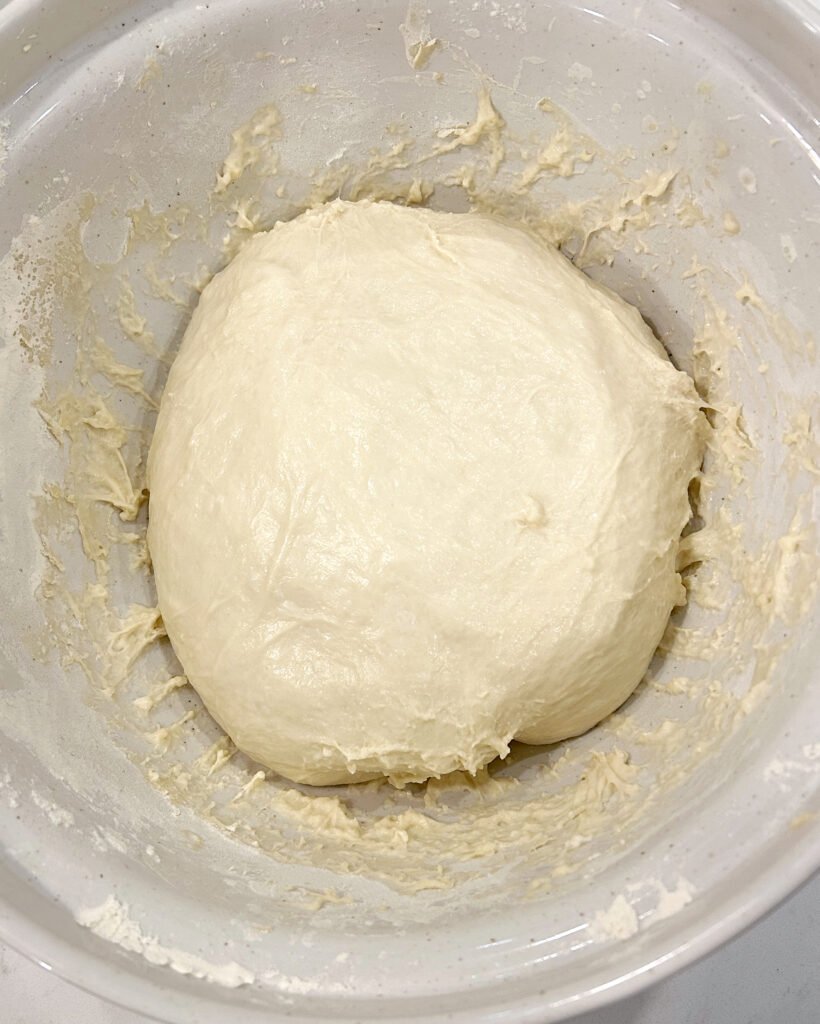
2. Next, add in the flour and the salt. Mix gently until a dough start to form, then I like to finish mixing it by hand until its a shaggy dough with no dry spots remaining.
3. Cover the bowl with a tea towel and let rest at rom temperature for 45 minutes.
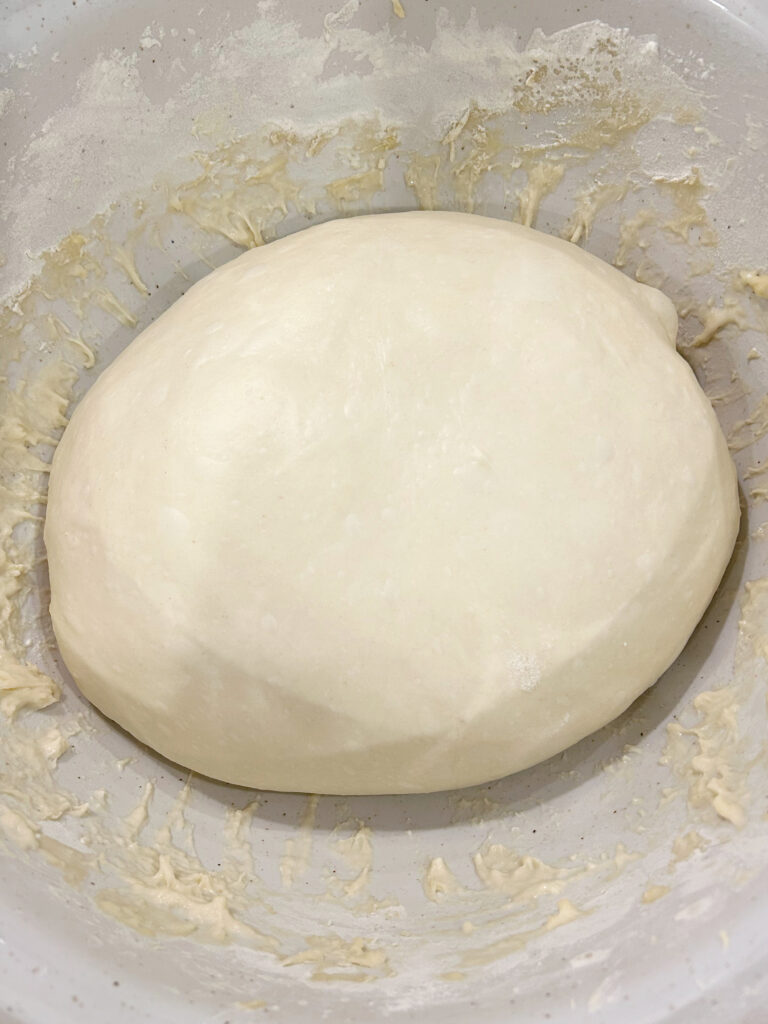
4. Once rested, perform the first set of stretch and folds or coil folds . I prefer coil folds but this video will show you both and either one will work. Cover the bowl and let rest for another 30 minutes.
5. Repeat step 4, 2-3 more times. If you have the time, do it 3 more times but if you don’t, you can have great bread with just the 2.
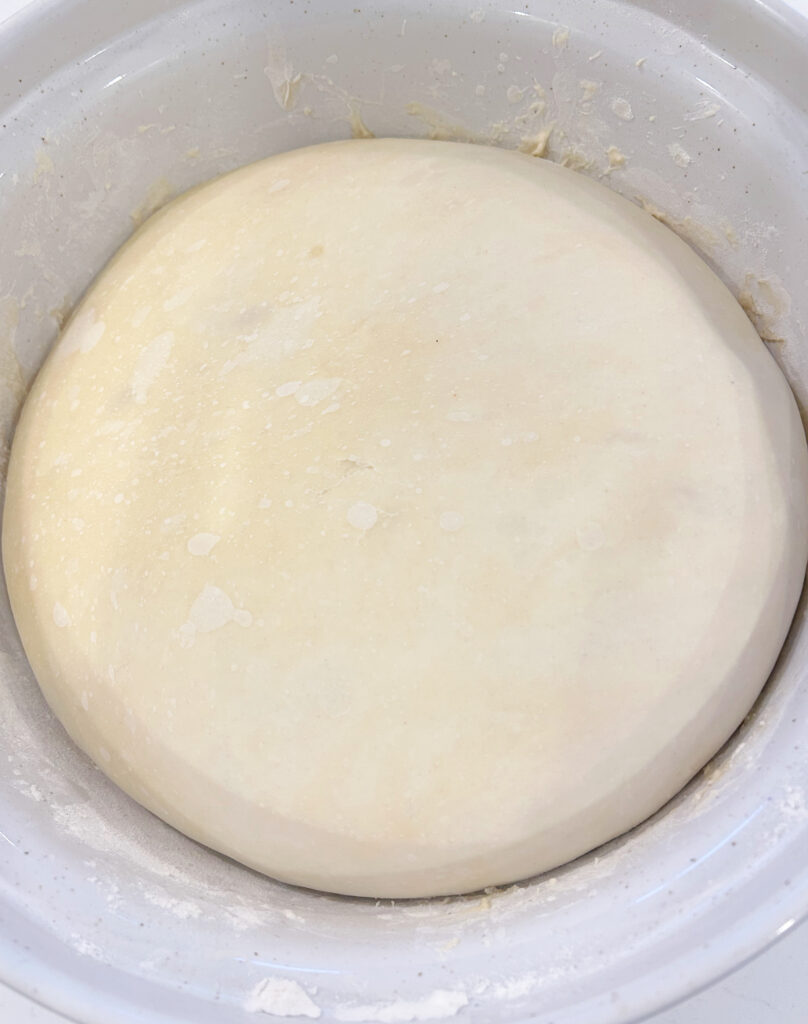
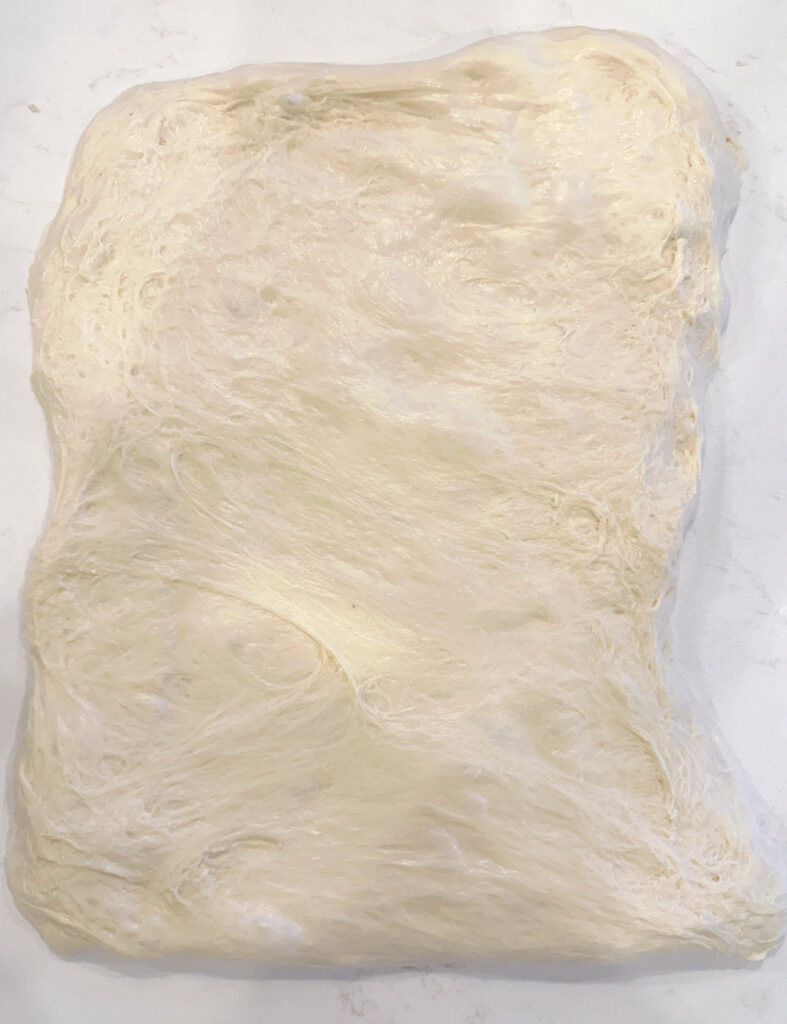
6. When you are done all the folds, cover the bowl back up and let it rest at room temperature for 4-6 hour or up to 8. I like to finish my folds right before bed so that my bread can rise for 8 hours while I sleep. Our house stays around 18 degrees Celsius. If your home is warmer than that, I recommend starting with 4-6 hours. You will know your bread is done bulk fermenting when it has doubles in size and is no locker sticky to touch. It should be domed on the top and look soft and fluffy.
How to- Shape and Bake
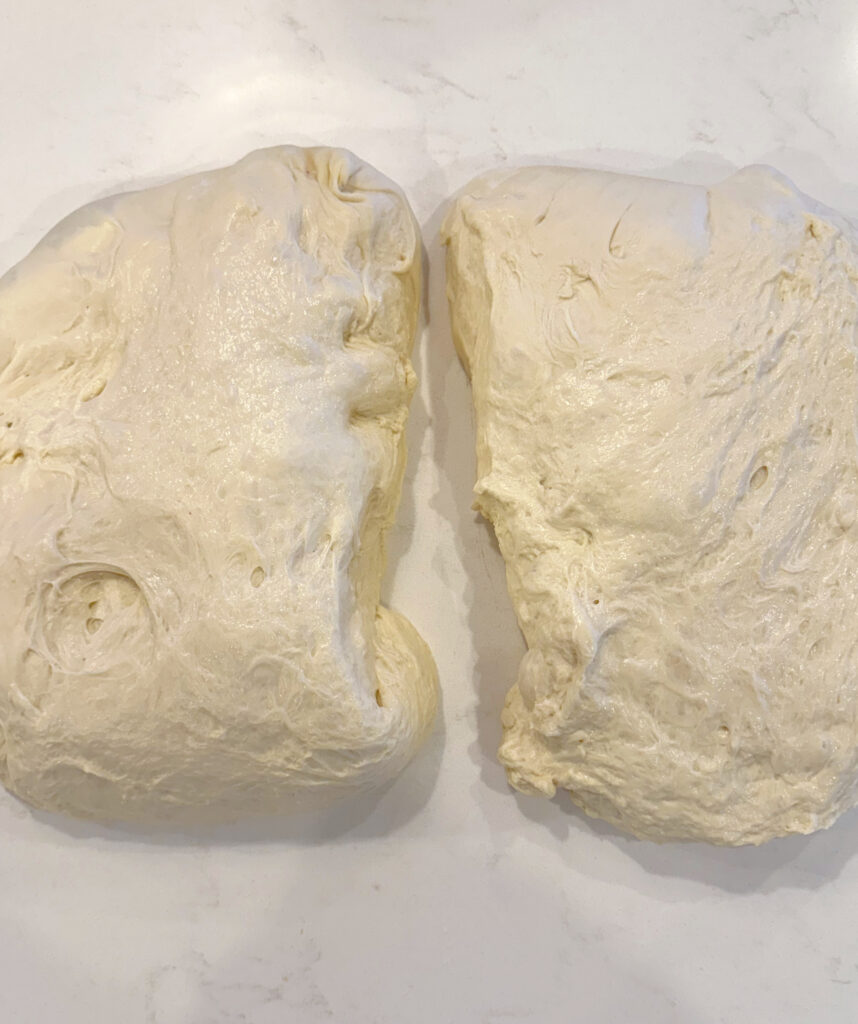
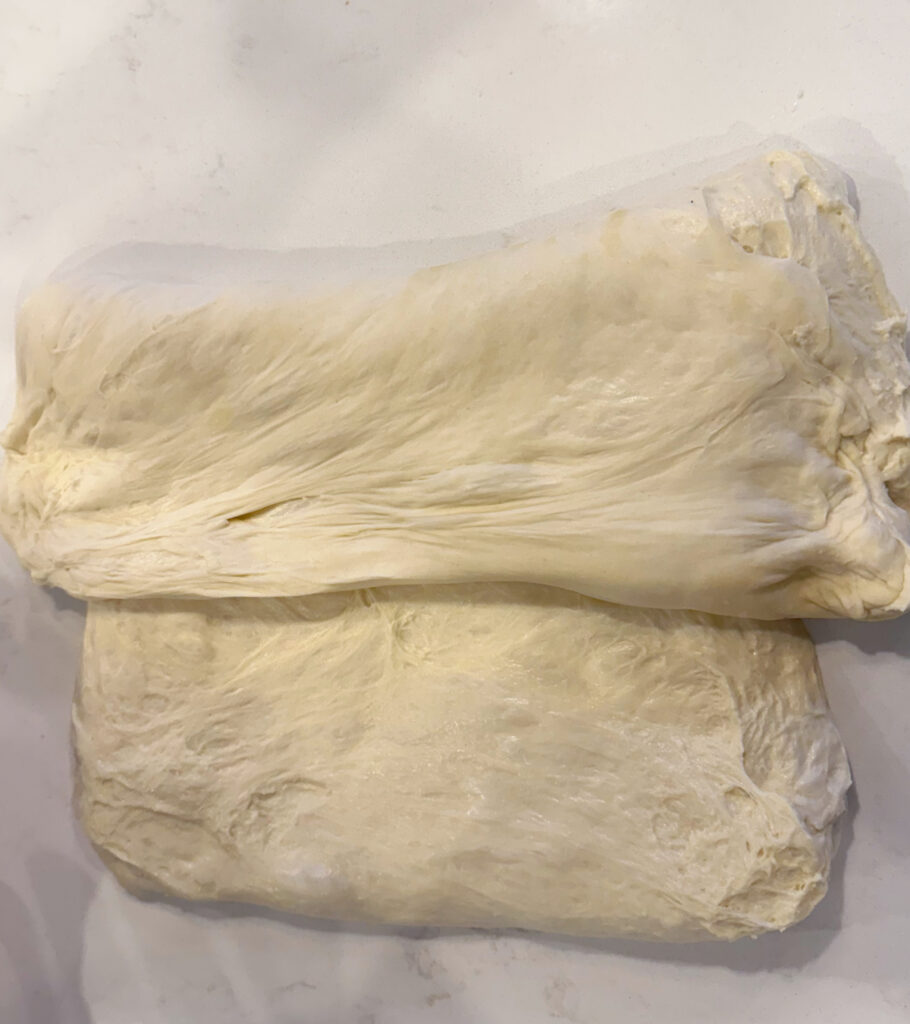
7. Then, its time to shape the bread (see below for photos). Dump the dough out onto the counter and cut into 2 pieces. Take each piece of dough and gently stretch it into a rectangle. Fold the top third of the dough into the middle, then the bottom third into the middle over top.
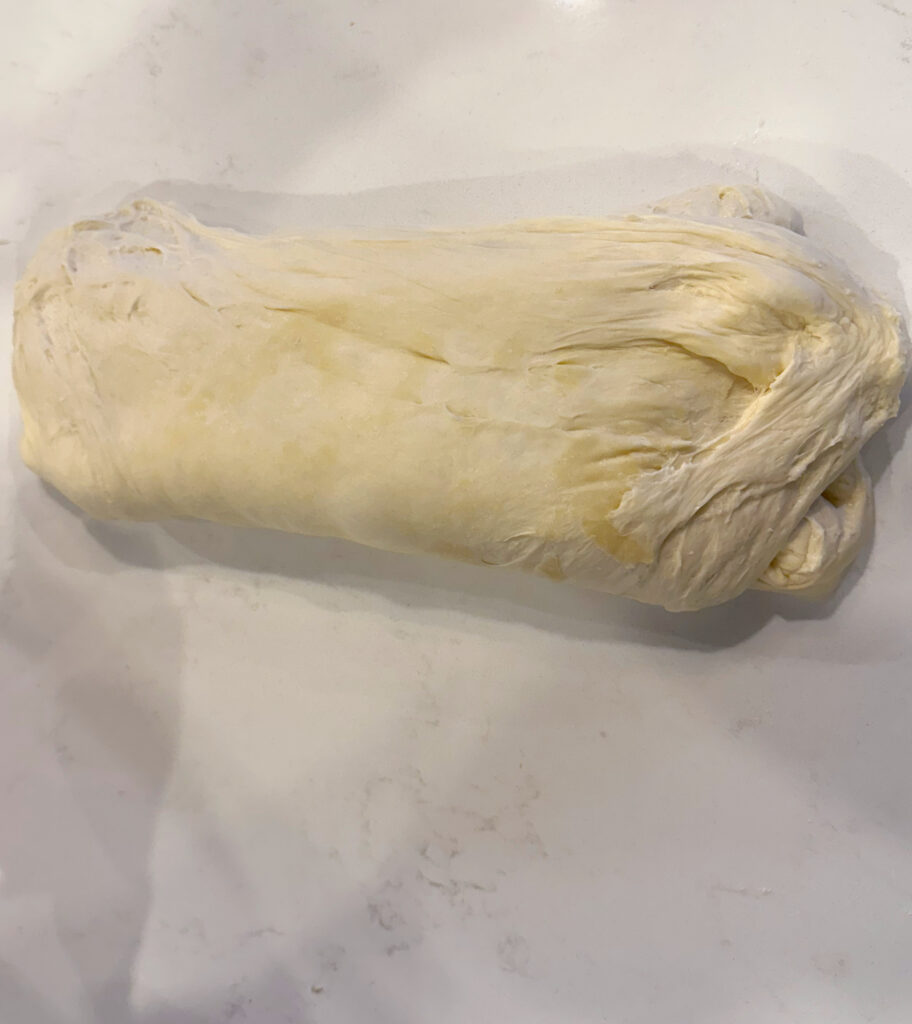
8. Start from one end of the folded dough, and roll it up. Then take the open sides of the rolled dough and gently pinch them together.
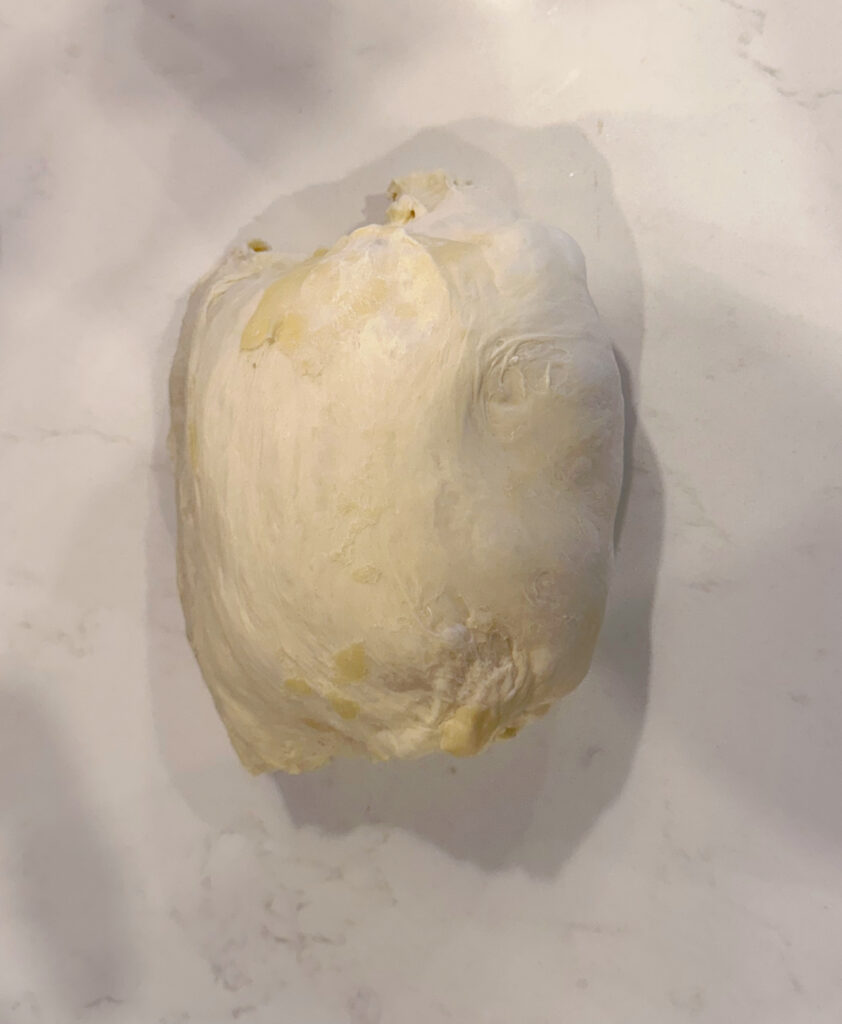
9. Using the heel of your hands, gently push the ball of dough away from you on the counter, then pull it back toward you. Imagine you are drawing a candy cane shape on the counter with your ball of dough. Repeat this 4-6 times, until the top of your dough is tight and smooth. This whole step, is to build surface tension on top of your loaf.
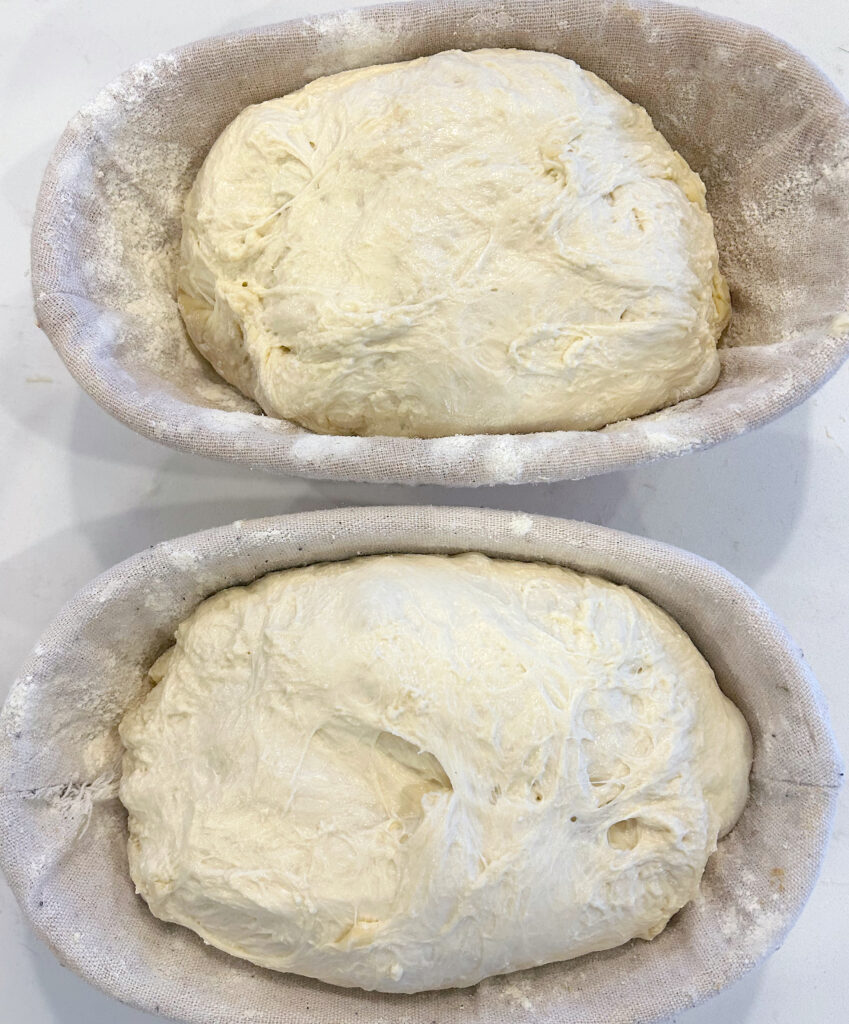
10. Gently flour the inside of your banneton or place tea towel inside a bowl and flour that. Flip the dough upside down placing the smooth side inside the banneton or bowl.
11. Next you are going to stitch the bread. This is where you pinch the dough and pull it into the center to create more tension on the top of your bread. You will do this around the whole ball of dough. Sprinkle some flour over top of the dough, then cover each banneton or bowl loosely with plastic wrap. Place in the fridge to ferment for minimum 8 hours or up to 2 days.
12. When you are ready to bake the bread, preheat your oven, with your empty Dutch oven inside to 450F. You want the Dutch oven to get nice and hot. Pull the bread out of the fridge and flip it out onto a piece of parchment or a bread sling.
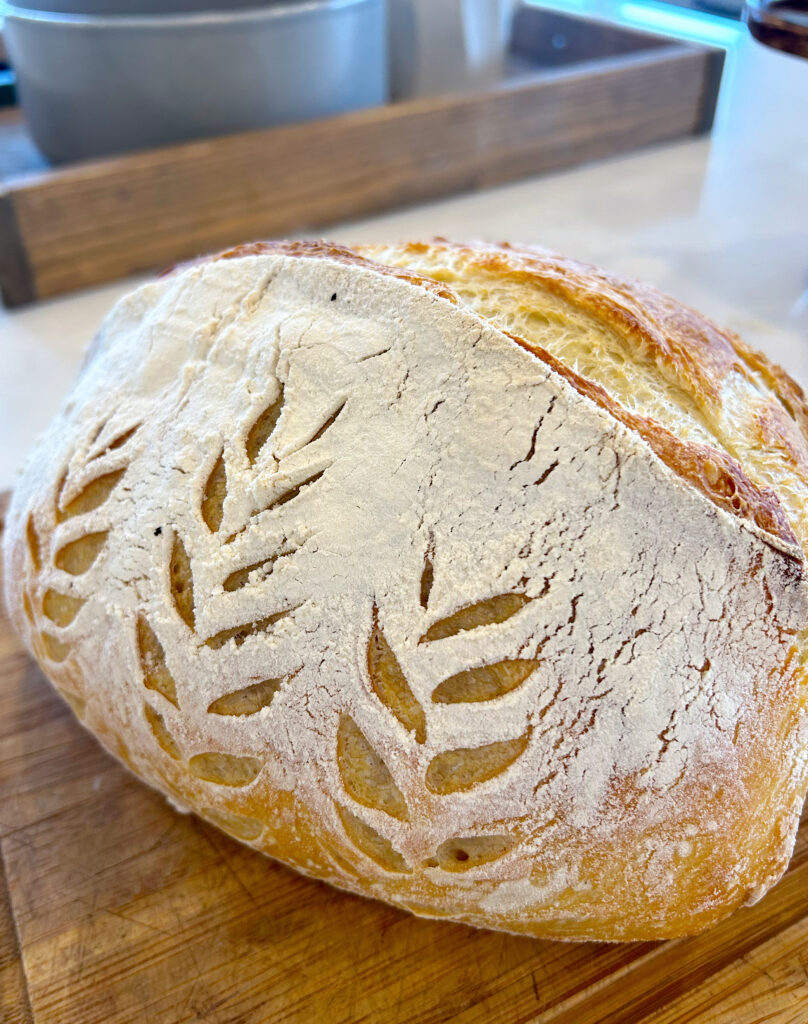
13. Using a sharp knife or a bread lame, score the top of the bread. You can do any pattern you choose, but the most important thing is that you score one big cut (about 1/4-1/2 inch deep). This is called an expansion score, which allows your bread space to grow while it bakes.
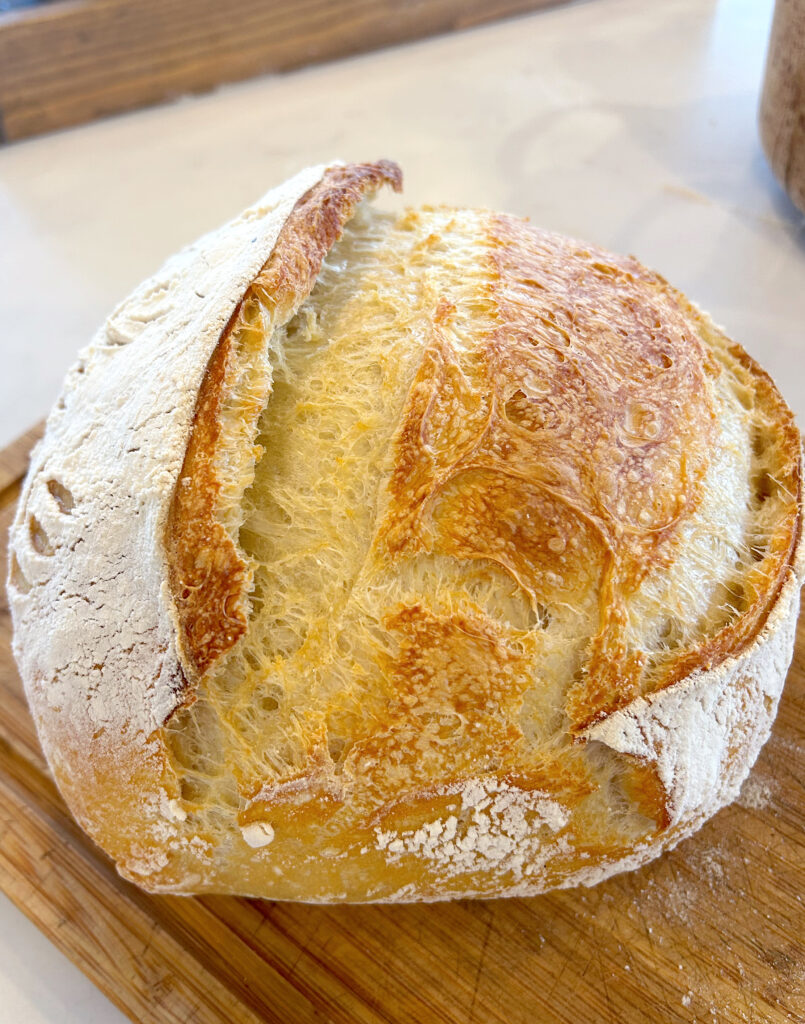
14. Lift the bread into the hot Dutch oven and bake with the lid on for 20 minutes then remove the lid, turn the oven down to 410F and bake for another 20-25 minutes or until desired color. I typically like about 22 minutes for a loaf that is not too brown and crispy.
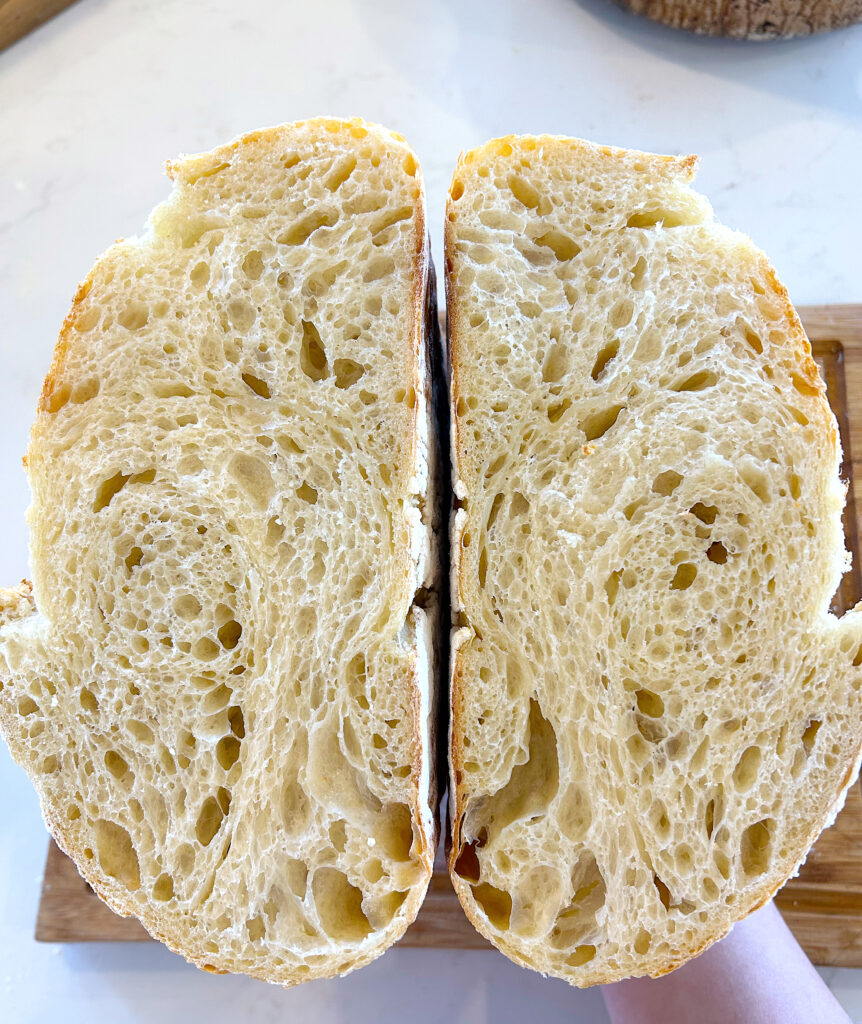
15. Remove the bread from the oven and allow it to cool for 1-2 hours before slicing with a sharp bread knife.
Perfectly soft and chewy sourdough bread with a lightly crispy crust. The only recipe you need. *This recipe makes 2 loaves, but if you only want 1, just half the recipe! *You don't need any special equipment to make sourdough but I have all of my favorite tools that I use, listed above in the post. *If you are unsure if your sourdough starter is ready to be used, see "how do I know if my starter is active a ready to be used" section above. 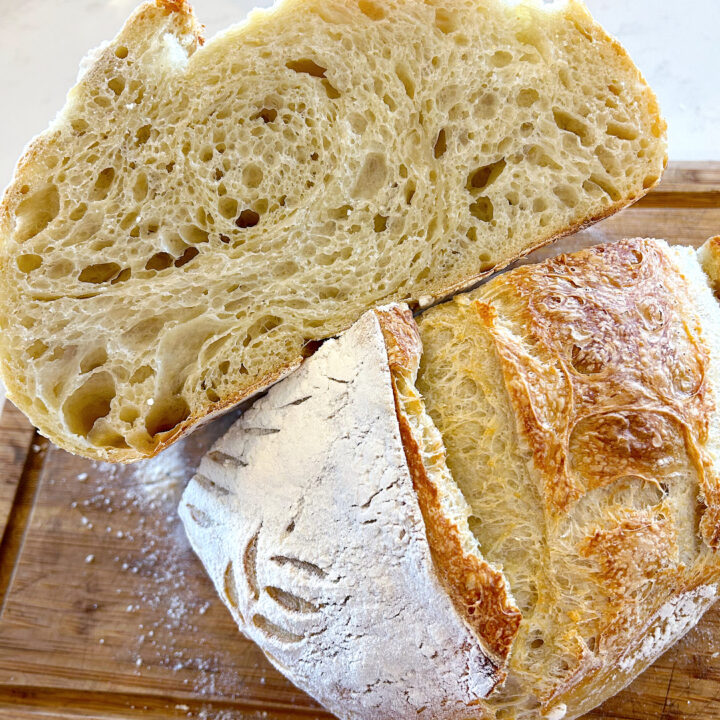
How to Make Perfect Sourdough Bread
Ingredients
Instructions
Notes


If I use a 1:1:1 ratio with my starter do I need to tweak anything to use this recipe?
You should not have to as long as you have a nice strong starter 🙂 I do always recommend feeding a higher ratio that 1:1:1 if you want the stronger starter though!
Thanks Morgan! Execllent directions and fantastic loaf – Finally a sourdough recipe that works for Michigan climate.
Mike
Amazing! So happy to hear it 🙂
I was wondering for the salt you wrote 2o salt for the sourdough bread recipe. Did you mean 2 grams of salt or 20? Thanks
oops! 20g. I will fix that. Thank You
What sourdough starter do you recommend?
You can get sourdough starter from a friend or purchase a dehydrated one off Etsy. OR You can make your own. I have a full highlight on our Instagram page on making your own starter at home 🙂
Looks amazing. I’m trying this method today. I’ve always followed a similar method but in the batten phase, I let it rise on the counter for 1.5 hours, then bake. However, I’ve been thinking my dough is a little over proofed as it’s not as firm as yours. Is the lack of refrigeration causing this? How does the refrigeration make a difference?
It could do yes. I would try putting it straight in the fridge after you shape it and put it into your banneton 🙂
Second time making this and both times my bread comes out flat, after cold proofing… i have a feeling my bulk proof is over proofing the dough 🙁 hopefully 3rd times the charm! Love all your recipes.
How long are you bulk fermenting your bread on the counter before refrigerating? Also, what is the temperature in your house? It may be a starter issue as opposed to a proofing issue!
I Made this recipe and the bead came out so soft I can barely slice it. Any tips on what I did wrong.
Did you let it cool completely before slicing? It will always be pretty soft on the inside (which we love) so if you do not have a good bread knife, it can make it hard to slice. Did it get a crust on it?
Thank you very much for sharing your sourdough recipe, it was easy to follow and I have baked my first sourdough bread and it turned out great 😊
Thanks again. ♥️
That so great to hear! Glad you had success and get to enjoy some delicious bread 🙂
My loaf baked up beautifully, but a little denser than I would have liked. I think that I added too much flour even though I weighed all the ingredients. Maybe adding a note to add the flour ‘a little at a time’ and mixing until a shaggy dough forms would help to allow for the varying moisture contents in the flour. I was a bit over-enthusiastic and dumped it in all at once. Overall I’m happy with it though, ready to give it another go. Thanks for the detailed recipe!
That is a great suggestion. Thank you! The bread can end up becoming dense if it is under proofed or if your starter isn’t super strong and healthy too!
I’ve been attempting to make bread for about 2 years now, never found a recipe I liked and turned out good so I didn’t bake often. Since finding your recipe I’ve made 8 loafs in 2 weeks, it’s AMAZING! so easy to follow and everytime the bread turns out so good. Thank you so much for sharing and brining me back to baking again
Ah this is so great to hear!! It truly is a game changer once you find that bread recipe that works for you. So happy you are having success and enjoying it 🙂
Hi! Excited to try this. When you take the bread out of the fridge it can go straight into the oven? Doesn’t need to come to room temp or anything like that?
Nope! Straight into the oven 🙂
Just wanted to say a massive thank you 🙏 I have been making sourdough bread unsuccessfully for the past couple of months. This recipe was perfect 👌 the crumb was beautiful soft with a lovely ratio of holes throughout and the crust easily chewy. 🙌🙌🙏😘
Wahoo! That is so great to hear. I will nevermake anohter recipe ever again because we love this one so much.
The sourdough rise on this loaf is beautiful!Affordable White Sourdough Bread In Mapleton UT
Have a Dutch oven & a loaf Dutch oven. Haven’t used the loaf one yet. Can I back both loaves together in both Dutch ovens at same time or do I need to only cook one at a time?
You can absolutely do both at once! I do this all the time.
Let my dough sit over night. Still doubled in size but very sticky. Too sticky to even work with to form into ball. Sitting in fridge now and will bake off after work. Any tips.
All flours are slightly different, so it may just be too much hydration for the one you used! You can try less water next time 🙂
Thank you so much for this recipe! Made it for the first time and it came out amazing! I added 4 cubes of ice to the Dutch oven second loaf and it came out with a glossy and perfect crust.
You’ve started my sourdough addition and I’m so grateful!
That makes me so happy to hear! Its the best addiction to have.
I’ve tried so many different recipes and every time my stretch and fold texture never leaves from somewhere between your pictures of “shaggy/starting” and “after first set of folds”, it doesn’t seem to firm up at all, any ideas of what I could be doing wrong?
most likely this is a starter issue and your sourdough starter isn’t developed or strong enough!
If you wanted to skip the fridge part and start early to bake end of day, how would you tweak this?
You can let the dough rest on the counter for just an hour or 2 before baking 🙂
I think it’s too much water for me, my dough was sticky after 8 hours of bulk fermentation. I did everything I usually do but lost my original recipe and found yours. My dough was weird like stringy and seemed over proofed. I did the shaping put in to the bannetons and into the fridge they both got huge and barely fit into my Dutch oven. Not sure if it will turn out. Next time I will decrease the water.
I would love to hear how they turned out! Mine always get really big in the fridge as well, but they turn out tall and beautiful. Every flour is slightly different, so yes it may be too much water for you if the dough was incredibly sticky.
Just saw you responded. The bread turned out really good and I had made it again but halved the recipe turned out delicious. Just made some dough last night and I completely forgot to use less water ugh but despite it turned out good! For reference I use the Kirkland organic flour from Costco.